ShieldQ offers an advanced document viewer built-in into the user's' control panel. The document viewer is used to view all document types in ShieldQ (Fax, Email, Upload and Web form). By clicking on a document in the inbox, the content of the document will be displayed in the document viewer.
(01) ShieldQ Menu Hide or show the ShieldQ menu bar to navigate to other sections of the portal. (02) Document Subject You can add or edit a document’s subject field by clicking the "i" button. The “document details" popup window will open to edit the document subject and other parameters. By default there is no subject for the received documents and “Untitled” is shown.
(03) File Selector (*) If this document has multiple files in it - for example, an uploaded document or an email, then this selection will allow to select the specific file within the document that you would like to view. Once a new file is selected, the document viewer will refresh the view to display this file.
(04) Document Settings The document settings will allow you to set the subject of the document, a unique reference for this document, specify tags and set values for custom properties. Unique Reference:
Only Owners of a document and shared users with “Can view and edit” share permission may edit the Unique Reference, custom properties and Tags.
(05) Share Document You can share the document with other users by clicking the share button. You then can specify which the users or groups can access the document and assign sharing permissions. Only Owners of a document and shared users with “Can share” share permission may share a document with other users.
(06) Transfer Ownership: You can transfer your credentials for a document to another user in your account by clicking the arrow next to the Share icon and select the Transfer Ownership option. Then, specify the user to transfer the ownership to. You may adjust your own permissions to: Can view, Can view and edit, or remove your access to the document. Only Owners of a document may transfer ownership of a document with another user. (07) Archive You can archive a document to hide it from your queue by clicking the Archive icon, and then clicking OK. Archiving a document is practically stating that this document has been handled. Archiving a document hides it from the Inbound Queue. You can use the advanced search for archived documents to view them or to return them back to the Inbound Queue.
Only Owners of a document and users with “Can view and edit” share permission may archive a document. (08) Mark as "read" or "unread" You can mark a document as "read" or "unread" to indicate whether you have viewed this document already. An "unread" document will be marked with bold text in the Inbound Queue. (09) Hide You can hide a document from your Inbound Queue by selecting the document, and selecting the Hide option. ShieldQ does not delete the hidden document. When you hide a document, ShieldQ only turns off the share with you. You cannot search for and find hidden documents. Only shared users (with “Can view” or “Can view and edit” share permission) may hide their shared documents (10) Delete You can delete a document permanently by clicking the Delete icon, and then clicking OK. Only Owners of a document and users with “Can view and edit” share permission to a document may archive. Account administrators may disable this feature for users with PCI credentials. Click to learn How to Disable PCI features. (11) User Menu The user menu will display your username and allow access to the profile and changing languages. (12) Toggle Sidebar You can click the Toggle Sidebar icon to navigate through a document by viewing thumbnails of pages and clicking a thumbnail to select it and view the page. (13) Find in document You can search for text within the open document. Click the Search icon, type the text, and click the right or left arrow. To have ShieldQ indicate all the found items, select Highlight all. By default, ShieldQ searches the text without considering the letter case. To search for text with capitalization, select Match case. The feature applies only with text-type files. (14) (15) Paging Options Previous page / Next Page: If your document has more than a single page, you can navigate through its content by using the page navigation buttons. (16) Page number: You can quickly navigate through a document by typing a specific page number in the Page box and then pressing Enter. Go to First Page / Go to Last Page: To go to the beginning of the document, click the ‘more options’ icon and then click the Go to First Page option. To go to the end of the document, click the ‘more options’ icon and then click the Go to Last Page option. (17) (18) (19) Zoom Zoom In, Zoom Out, Automatic Zoom: You can increase and decrease the magnification by clicking + or -. To specify a magnification, select a zoom option from the list to the right of the + button. (20) Remove Sensitive Content tool This tool enables users to hide sensitive content or private information that are visible in the received document. This tool permanently removes visible text and graphics from a document by “burning” a black box over the selected area. In order to black out certain areas, zoom in to a sensitive content area, choose the “Remove Sensitive Content” tool in the ‘more options’ button, draw a rectangle above the document, and then confirm the process. The action is permanent. After “burning” the selected area, the document cannot be restored. (21) Scan Text This tool allows you highlight a specific area of the document and extract the text that is listed there. Once done, you can copy the text and paste it elsewhere. The feature applies only with text-type files. (22) Print You can print the selected document by clicking the Print icon and specifying the print options. Account administrators may disable this feature for users with PCI credentials. Click to learn How to Disable PCI features. (23) Download You can download the document to your computer. First, specify the download format (PDF, TIFF, or PNG) and then click the Download icon. Account administrators may disable this feature for users with PCI credentials. Click to learn How to Disable PCI features. (24) (25) Previous page / Next Page: If your document has more than a single page, you can navigate through its content by using the page navigation buttons. (26) (27) Rotate You can rotate the page view by clicking the ‘more options’ icon and then clicking Rotate Clockwise or Rotate Counterclockwise. (28) Hand tool You can use your computer’s mouse to navigate through a document by clicking the ‘more options’ icon and then clicking the Enable hand tool option. (29) Document Properties The document properties will show you information about the particular file you are viewing (file size, date created, number of pages, etc).
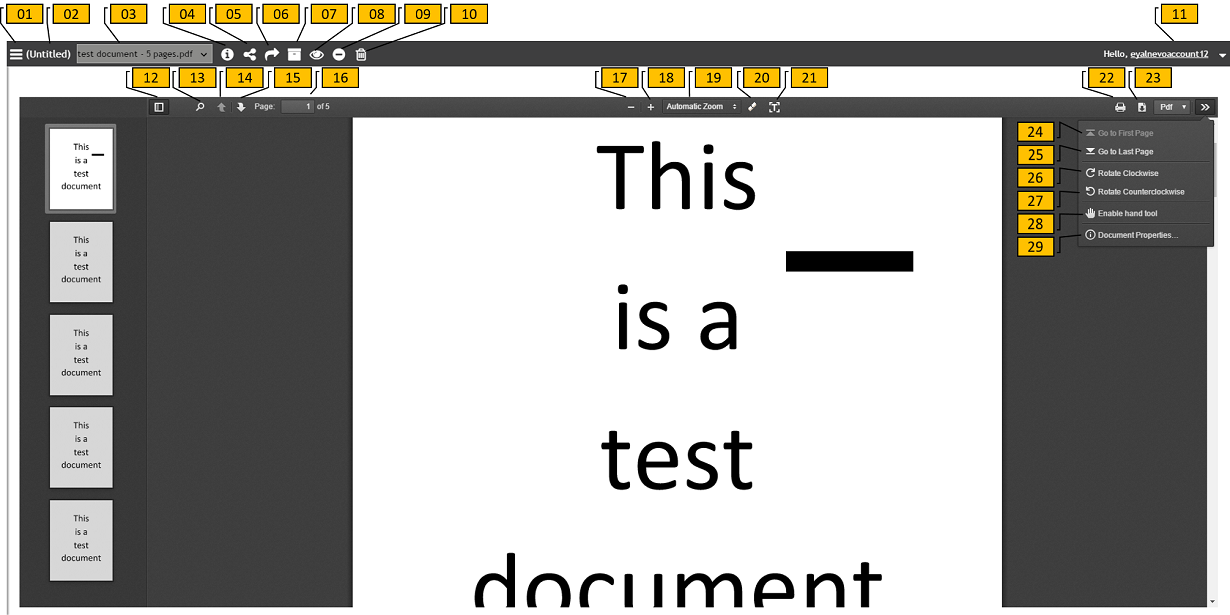
Below is an image of the document viewer. Each number represents a feature or an option in the document viewer - click on a number and you will automatically scroll down in the page to the area that describes this feature.
Don't forget - the document viewer was opened in a new tab.
Only Owners of a document and users with “Can view and edit” share permission may rename a document.
(*) Please note if there is only one file in this document - for example, an inbound document, then this selection will not be displayed.
You can add a unique reference to your document to enhance your searches by clicking the Tag As icon and selecting the My Unique Reference section. Type text for the reference and click Save.
Shared Properties:
If your account’s primary user added shared properties, you can edit them to each received document for enhanced searches. To edit Shared Properties, click the Tag As icon. Then click the Shared Properties section to edit one or more shared properties.
Tags:
You can add tags to your document for enhanced searches. To add tags, click the Tag As icon. Then click the Tags section to select one or more existing tags or to create a new tag.
Only account administrators can add new custom properties.
Only account administrators can define groups and add users to groups.
The general procedure for working with received documents is: